Wednesday, December 14, 2011

A (Big) Dot Release

Although dot releases don't get as much attention as major releases , this one should definitely get highlighted:

      "Zend is pleased to announce the release of Zend Studio 9.0.1!"

This new release focuses on improving source code editing experience, improving editor performance, smart indentation when pasting code. It also extends the code formatter so PHP comments are well structured. Working with PHPUnit made easier with the addition of smart configuration (and bootstrap)  detection. Community plugins updates provide advanced features with Git, ZenCoding and Symfony2.

The changes include:
  • Improved editor performance for multi-line statements and auto indentation scenarios
  • Adjust indentation when pasting code
  • New code formatter rules for PHP Comments
  • Disable/Enable Code formatter with special @formatter:off/on tags
  • Git history graph
  • PHPUnit auto-detection of configuration (and bootstrap) file
  • Improved PHP Class creation for namespace code generation
  • Easy installation of community plugins ZenCoding and Symfony2 and Twig 
  • Various bug fixes

Monday, December 05, 2011

Rewrite Rulez!!!

While common Web frameworks provide a set of mod_rewrite rules in their default application, it is left to the developer to align these rules according to the Apache host configuration. For example if you use an alias when setting up a Symfony application then a RewriteBase directive must be added to the application rules. This is a common change that is required to keep the original list (provided by the framework) as is.

To this end a post-deployment action can be added to fix the RewriteBase directive in the '.htaccess' file. In a previous post, application deployment scripts were used to help chmod application's resources. This time I am going to use deployment hooks to modify the RewriteBase directive automatically after deploying the Symfony2Cloud application.

In the deployment script you can find this code:

<?
// get application location
$appLocation = getenv('ZS_APPLICATION_BASE_DIR');
// modify htaccess
$htaccess_file = $appLocation . '/web/.htaccess';
$explode = explode ( '/', $appLocation );
$appname = $explode [sizeof ( $explode ) - 2];
$content = file_get_contents ( $htaccess_file );
$content = str_replace ( '<application-name>', $appname, $content );
file_put_contents ( $htaccess_file, $content );

In details: The application location is used to resolve its alias. Then the alias name is used to replace the .htaccess file content so instead of "RewriteBase /<application-name>" it will show up as "RewriteBase /Symfony2Cloud".

Assuming that you use Zend SDK and the following deploy command:

zend deploy application -r git://github.com/ganoro/Symfony2Cloud.git

Symfony2Cloud is now deployed and ready to use with this .htaccess:

<IfModule mod_rewrite.c>
 RewriteBase /Symfony2Cloud

    RewriteEngine On
    RewriteCond %{REQUEST_FILENAME} !-f
    RewriteRule ^(.*)$ app_dev.php [QSA,L]
</IfModule>

Wednesday, November 30, 2011

Github to Zend Developer Cloud - the fast way!

In previous posts I discussed several methods of building Web applications using Zend Developer Cloud and github, mainly with tools like Eclipse and Zend Studio. This time, I will show off with a new feature in Zend SDK v0.0.22 (and up) presented by Wojtek Galanciak.

With this feature only one command line is required to deploy applications from github to Zend Developer Cloud. Here is a simple example:

zend deploy application -r git://github.com/ganoro/Symfony2Cloud.git -t 0

"Symfony2Cloud" repository is hosted in my github account. Target id 0 is my Zend Developer Cloud container. This command makes sure that the applications is deployed into my Zend Developer Cloud container. As simple as that...


Read more about this command and similar use cases with the new Zend SDK. Release notes are available here.

In my next posts I am going to explain about the new repository management tools, so stay tuned.

Sunday, November 27, 2011

chmod() your phpCloud Web Apps

A common feedback from developers using Web Apps on Zend Developer Cloud is the ability to chmod() directories for deployed applications. For example in Joan Ging's post you can notice that one needs to use external tools (like WinSCP or Zend Studio) to chmod the logs and cache directories that are used by Symfony2, otherwise these directories are write-protected and the application fails to launch.

There are two methods to chmod application directories after the deployment stage and before launching.
So let's review the two alternatives, both of them result in the same state:
  1. Using Deployment Scripts (during deployment phases).
  2. Using Zend Studio (after the application is deployed)

Using Deployment Scripts

One of the new features in phpCloud is the ability to deliver hook scripts alongside the application. There are several types of scripts for each phase in the deployment process (i.e, Staging, Activation).
In the following example, chmod is executed on both logs and cache directories immediately after being executed on their parents.
First we define the "scripts" directory to contain all deployment triggers. This is done as part of the deployment descriptor file (named deployment.xml):

<?xml version="1.0" encoding="UTF-8" standalone="no"?>
<package xmlns="http://www.zend.com/server/deployment-descriptor/1.0" version="1.0">
    <name>Symfony2Cloud</name>
    <version>
        <release>1.0.0</release>
    </version>
    <appdir>data</appdir>
    <docroot>data/web</docroot>
    <scriptsdir>scripts</scriptsdir>
</package>

Then we create a post_stage.php file under this directory with this content:
<?php
/* @var string holds the application (absolute) path */
$appLocation = getenv('ZS_APPLICATION_BASE_DIR');
/* chmod cache and logs */
chmod ( $appLocation, 0775 );
chmod ( $appLocation . '/app/',0775 );
chmod $appLocation . '/app/cache/', 0775 );
chmod ( $appLocation . '/app/logs/', 0775 );

The complete source code for this application is available in the Synfony2Cloud project on Github.

Using Zend Studio 9.0

Once you deploy your application in Zend Studio, a connection to your container is created under the hood. You can view this connection and modify the directories permissions in the Remote System view.

1. Start by showing (or "unhiding") hidden files. This allows you to browse the ".app" directory which holds all deployed applications.
Go to Preferences > Remote Systems > Files and make sure "Show hidden files" is marked.


2. Browse to the application you want to chmod() by expanding the file tree in the Remote Systems view


3. Right click on the directory and select Properties. 
4. Select the Permissions node, alter the permissions you want to allow and click Apply.


Although Alternative #2 is more flexible, I highly recommend Alternative #1 which streamlines the deployment phase and lets you adjust the code and create an automate deployment process.


Wednesday, November 02, 2011

What is coming up from Zend?

If you have already heard about phpcloud.com and Zend Studio 9 or just trying to grasp what new developer workflows Zend is now offering, you may find the new tutorials that the Zend documentation team have put together quite useful. These tutorials take you through end to end real world scenarios and outline what can be achieved with the new tools and platform. These tutorials include:

Building Applications on the Zend Developer Cloud (link)
  • To create GitHub and Zend Developer Cloud accounts. These will be used to maintain a project in GitHub and to deploy on Zend's cloud platform. Github is just an example, you could use other version control system such as Git, Subversion, CVS, Mercurial. 
  • To create a new container in the Zend Developer Cloud. The container holds your application in the cloud.
  • To create a new project from GitHub. You will be using an existing GitHub project to create a new project in Zend Studio.
  • To launch the application on the Zend Developer Cloud and debug it using Zend Studio.
A Guided Tour of Zend Application Deployment Support (link)
  • To create a new project from GitHub in Zend Studio: You will be provided with an existing GitHub account and project.
  • To work with your project's deployment.xml file: Launching a project in Zend Studio with deployment support creates a deployment.xml file. This file enables you to customize your application before the packaging process.
  • To create a ZPK package: Packaging your application enables you to export it to other members of the working process for testing and evaluation.
Deploying Applications to Zend Server (link)
  • To create an API Key. The API Key allows Zend Studio to access your server.
  • To create a new PHP project from SVN in Zend Studio. You will be provided with an existing SVN account and project.
  • To deploy your project on a remote Zend Server.
  • To launch your application. After creating your application, Zend Studio enables you to run your application from within the IDE and in an internal browser
Running Applications on a Local Zend Server (link)
  • To create a new Zend Framework project under the local server document root. 
  • To debug your application and modify code.
  • To launch your application.
Customizing Zend Studio (link)
  • To customize Zend Studio by adding and removing the plugins you want to work with. The Welcome page includes a list of available plugins, which you can add or remove from your Zend Studio.
  • To register Zend Studio. Once Zend Studio is installed, all its features will be available for a 30 day trial. To enable full features after this period of time, you will need to register the product.


Thursday, October 27, 2011

Eclipse Continues to Support PHP and Zend Developer Cloud

The last two weeks were a-m-a-z-i-n-g! We released two major pieces that can turn Web development as easy and obvious as writing this hello world application. This time I would like to present additional important piece that the Zend team provide today to enable PHP and Web development (special thanks to @nataliabartol). Welcome the 'Eclipse-based package by Zend'. This package includes the Eclipse Platform latest release (version 3.7.1, code name Indigo-SR1), the Web Tools Source Editing plugin, the PDT plugin (latest version) and the Zend SDK plugin (this plugin enables Zend Developer Cloud). You can find the package and more information about this release here. The size of this package is ~90Mb (depending on your operating system) and users need to extract the package to run the product.

Zend is the provider of Zend Studio 9.0 and lead the Eclipse PHP Development Tools (PDT) project as well as the Zend SDK project. This Eclipse-based product will mainly be useful for developers working with PHP and their workflow includes tasks such as PHP/HTML/Javascript/CSS sources editing, debugging and deployment of Web applications.

The following two minutes demo shows a simple create-deploy-debug cycle enabled by this package:


My team will definitely consider leveraging the Zend SDK to work with more solutions available in the market providing Integrated Development Environment (IDE) for PHP Developers such as Netbeans and  phpStorm, stay tuned!

If you have any questions or comments, feel free to comment below.

Tuesday, October 25, 2011

Pull Down an Application Created on phpCloud

One of the most promising features in Zend Developer Cloud will be to deploy today's most-famous Web applications directly into your container, without being required to supply the application package. The list of pre-packed applications includes projects like Drupal, Joomla, Magento, Wordpress and a customized Zend Framework. Probably Zend will add more applications in the future (want to suggest one?)

The obvious question is, what will be the best practice for working with an already deployed application and how to pull it down to your development environment?

As a background there are two ways for managing an already deployed project, you can select either of the following options depending on your high level development workflows and your tools (ahch, ahch, Zend Studio supports both of them). One important note that is applied for both solutions - you don't need to deploy the project once again. Just modify the content and make sure it's updated properly in the cloud.

Clone Application via Git Repository

One of the Easter Eggs hidden in this already-packed deployment feature is that once an application is deployed, a git repository is created so developers can clone it and later on push their content. Use a command line tool or any development  environment to clone the application. Then use push to upstream git action to update the actual remote application.

To retrieve the application Git Repository, go to you container overview page:
https://my.phpcloud.com/container/<container-name>/overview and push the "git access" button. Use your container name and password as username and password when you make any operation with this repository.


This Git repository authentication is based on secured HTTP with the following details:

  • URI: the path provided by Zend Developer cloud (see above)
  • User: container name
  • Password: container password

Using Zend SDK:

You can use the latest Zend SDK to clone the code to your machine by running the git clone command with your git repository parameters:

zend clone project -r <git-repository-url> -u <user> -p <password>

Using Zend Studio 9.0:
We are about to use a new feature added to Zend Studio in its latest release that enables you to clone a Git repository, start by File | New | PHP Project from Git. A wizard will show up and you will need to enter the information required for this clone operation to happen.


Follow the wizard and hit "Finish". Once your project is cloned, you can start a debug session right-clicking on the index.php file and selecting "Debug as...", supply the full URL of the application and press OK.


Don't forget to open the SSH Tunnel by right-clicking on its node that available in the Targets view and selecting "Open SSH Tunnel"


Download Application via SFTP Client

The trivial way is to use an integrated SFTP client that supports download and upload actions to the SFTP server installed on your container. Remember the following:


  1. Authentication to the SFTP is made using the private key given the time you created the container or user. So you will need to add it to the private keys manager (in Zend Studio / Eclipse it's under Preferences > General >  Network Connections > SSH2. In the General Tab, add the private key file to the text field named: "Private Keys". You don't have to specify a username and password as you use the private key.
  2. The application content is located under the directory named  .apps/http/__default__/0/<user-name>/1.0.0


Hope this tutorial helps you to configure your development environment and you take advantage of it, but if you think there is a different (better) way don't hesitate to comment below.


Saturday, October 22, 2011

Test Drive Zend Developer Cloud with Zend Studio 9

Zend Studio and the Zend Developer Cloud support an integration environment for projects hosted in GitHub. This allows you use the cloud to deploy, debug and modify your Web applications hosted in GitHub  from Zend Studio.

This workflow includes the following tasks:
  1. Creating accounts for GitHub and the Zend Developer Cloud 
  2. Developing a project hosted in Github with Zend Studio and the Zend Developer Cloud
  3. Debugging your application 
  4. Automatically updating your application in real time
Prerequisites

An installed Zend Studio 9.0 (currently on beta) or above. Can be found in one of these pages:
Creating an Account for Github and the Zend Developer Cloud
In order to use GitHub and the Zend Developer Cloud, you must first set up valid accounts for both.
 To create a GitHub account:
  1. Open the GitHub website at https://github.com/. 
  2. Click Plans, Pricing and Signup in the center of the welcome page. The Plans and Pricing page appears. Click Create a free account. The Signup for GitHub page appears. 
  3. Enter your account details in the requested fields, and click Create an account. Your new account page appears. 
  4. Follow the instructions on the Github homepage and create a project and repository. 
  5. For more information on creating a GitHub project go to help.github.com 
To create a Zend Developer Cloud account:
  1. Open the Zend Developer Cloud website at http://www.phpcloud.com/. 
  2. Click Login here in the top-right corner of the homepage. 
  3. Click I do not have an account. The Create a new account page appears. 
  4. Enter your account details in the requested fields, and click Register. The Thank you for creating a Zend account page appears. 
  5. Please answer the questions that appear on the page and click Finish. The Log In page appears. 
  6. Enter your account details, and click Log In. The Zend Developer Cloud welcome appears. 
  7. Click Start now to begin working! Save your Zend Developer Cloud credentials as you will need them later in this workflow.
Working with a Project hosted in Github with Zend Studio and the Zend Developer Cloud

Once you have an existing GitHub and Zend Developer Cloud account, you can use the integration features embedded in Zend Studio and Zend Developer Cloud. You can develop, test and deploy a GitHub application on the cloud through Zend Studio. To create a new container:


  1. Go to the Zend Developer Cloud homepage and open your account and click Start Now on the welcome page. The Create Container page appears. 
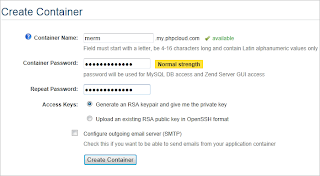
  2. Enter the container name and password in the relevant fields, and click Create Container. The SSH Keypair created window appears. 
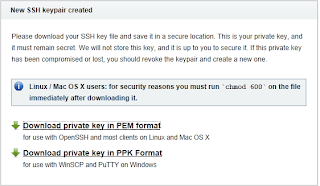
  3. Click Download private key in PEM format. Save the key on your machine as you will need to browse to it when connecting Zend Studio to your server. Your container has been created and will appear under My Containers on the homepage.
Installing the GitHub Plugin into Zend Studio

Zend Studio gives you the option to use only the plugins you need. For this tutorial, you will need GitHub.

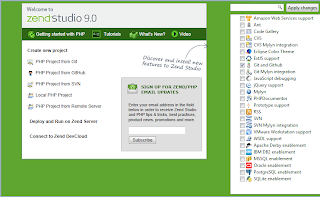
  1. Go to Help | Welcome to open the Zend Studio Welcome screen. 
  2. From the plugin list on the right, mark the Git and GitHub. 
  3. When prompted, restart Zend Studio . When you re-open Zend Studio, the GitHub plugin is installed.

Creating a GitHub Project in Zend Studio

To create a GitHub application in Zend Studio:

  1. Go to File | New |PHP Project from GitHub. The Create Project from GitHub dialog appears. 
  2. Enter the project name and your GitHub authentication details in the relevant fields, and click Refresh. Your application location will appear in the Location box or in the dropdown menu. 
  3. Click Next to move to the Application Deployment dialog.
  4. Select Zend Application Deployment and create a new target by clicking on the PHPCloud icon . The Add Target dialog box appears
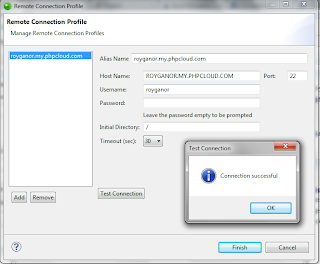
  5. Enter your Zend.com credentials and browse to your PEM key in the relevant fields, and click Test Connection.
  6. If no errors appear, click Finish. The Application Deployment section reappears with the target you added.
  7. Make sure the ‘Add Application Deployment Support’ checkbox is marked
  8. Click Finish. Your application will opens in the Zend Studio workspace.


Deploying Your Application on the Zend Developer Cloud

Open your project in Zend Studio. The default file, deployment.xml, opens.

  1. In the Testing area, click Launch a PHP Application The Launch PHP Application dialog opens with the default container you defined during the project creation selected, and your application’s URL
  2. Click Finish and Yes when prompted about your container’s authenticity
  3. Your application appears in your container’s page in the Zend Developer Cloud website, and opens in Zend Studio’s internal browser. Keep the internal browser with your application open as you will need it to automatically update the application.

Debugging Your Application on the Zend Developer Cloud


  1. Open your project in Zend Studio. The default file, deployment.xml, opens.
  2. In the Testing area, click Launch a PHP Application in Debug Mode
  3. Your application now appears in the Debug perspective and stops at the first breakpoint. To continue the debug click .

Automatically Updating Your Deployed Project in Real Time

Zend Studio allows you to automatically update any changes you make in the source code of your application without redeploying the application from the start. Each change you make in the code will be automatically updated in your application on the server.
To automatically update your application:

  1. In the PHP Explorer view, open your projects index.phptml file by going to application| views| scripts | index| index.phptml. The index.phptml file opens in the text editor. 
  2. Make a small textual change in the code and save the project.
  3. Go to the internal browser of your project and click the Refresh icon . Your application updates with the changes applied.
Note: this article describes the workflow as available today for phpcloud developers. I am not sure if this will be the case in next versions, so you should get updated with the php cloud release notes. It was written by the documentation team at Zend, if you have any comment feel free to post it below.

Tuesday, October 18, 2011

First API released for phpcloud.com

In previous post, I presented the Zend Developer Cloud Platform and some thoughts about it. It's time for me to show some pretty cool API we added for developers who want to exploit all the goodies from it. In a nutshell, the Zend Developer Cloud API enables you to authenticate, list your containers details and get a very nice information about your requests, and of course to start debugging of specific events occurred lately.

The first implementation using this API is the Zend Developer Cloud sniffer that "integrates into the PHP runtime and watches for various events such as errors, failing functions, slow scripts and database errors. This allows you to debug your application during development, helping you create a better application.". And the first implementation of this API is available under EPL at the Zend SDK source code In more details the following API is available:

  1. authenticate(u, p, _success, _error)
    Authenticate to the Zend Developer Cloud service given the username and password. Once authentication is validated, a session id is retrieved and assigned as cookie
  2. list(_success, _error)
    Lists all containers for the signed in user
  3. requestSummary(containerName, requestUid, _success, _error)
    Retrieve information about a particular request's events and code tracing. The requestUid identifier is provided in a cookie that is set in the response to the particular request.
  4. downloadAmf(containerName, amf, _success, _error)
    Download the amf file specified by codetracing identifier
  5. startDebug(containerName, issueId, eventGroupId, _success, _error)
    Start a debug session for specific issue

Better Together - Github and Zend Developer Cloud

The two Cloud-based services Zend Developer Cloud and GitHub share some common traits. Although these services are loosely coupled, developers using one service can easily find interest in the other. For example the openness of the services to application developers world, the (so important) social dimension and the fact that it is just easy to use through a set of APIs and tools, make these two services fun to work with... together.

It takes four command lines to see the value (you will need to install Zend SDK first):

# clone an example 'hello tweet' project from a github repository
$ zend clone project -r git://github.com/zendcon/hellotweet.git

# define a Developer Cloud container to host your application
$ zend add target -d account-name:account-password

# set working directory
$ cd  hellotweet

# deploy the newly created application to the defined target
$ zend deploy application 

The result is available as a ready to use Web application http://royganor.my.phpcloud.com/zendcon/ and since I made the container public anyone can create the same container through http://my.phpcloud.com/container/create/snapshot/royganor-snapshot-20111018054539

But there are more similarities, let's review some of them:
  • Identities are open and visible between developers 
  • Applications and repositories are listed:


  • Social activities are available for developers who want/need continuous and fast feedback  


If you are interested in more information about specific aspect of the solution, share it here and I will answer you.


Zend Launches Developer Cloud & SDK To Give Developers Access to Web Applications Market

Zend, The PHP company and the place I work for the past 5 years has made some significant steps over the last year to enable Web developers to deliver scalable Web applications. As part of our strategy Zend has been full-steam ahead on creating better ways for Web developers to make application deployed on a self-served container which can be scaled up and down which have been traditionally difficult areas for PHP developers to execute effectively.

In May the Zend Server team has published a major update to the product with the ability to create application packages that consist of source code, metadata and scripts, and of course deploy applications on any number of servers. At about the same time, my team has worked to deliver tools supporting these capabilities.

Today, Zend is adding the remaining piece, again utilizing its current product line. The company today announced that it is releasing the Zend Developer Cloud and a software development kit (SDK) called Zend SDK to enable Web developer build their applications on a robust platform in a very short time. This is of interest for the very reason that this service is given for free by Zend.

When it comes to entering the PHP applications market like Wordpress, Drupal, Magento, Zend Framework apps, developers are met with a number of obstacles, including environment requirements and unstructured development tools. The advantage then, of Zend′s new platform and SDK is that now developers have streamlined workflows to develop their applications.

To demonstrate how easy it is to create Web applications with the new tools, I created a GitHub repository for a #zendcon tweeter channel  https://github.com/zendcon/hellotweet and made it available on my container at http://royganor.my.phpcloud.com/zendcon/ in about a couple of minutes.

Stay tune for more posts and information about this news.


Wednesday, September 28, 2011

Zend Studio 9 Early Access build #262 now available

In a previous post I demoed how Zend Studio 9 is going to make Web application development much easier and faster. I am pleased to announce that the Early Access (build #262) is now available so early adopters can put their hands on and tell us about their experience with the new product.

Feel free to post your feedback here or in Zend Studio forum.

For Windows (212 Mb)
For Windows without JRE (182Mb)
For Mac (172Mb)
For Linux 32-bit (173Mb)
For Linux 64-bit (176Mb)

Tuesday, September 27, 2011

Agile Web Applications Development with Eclipse Indigo and Zend Studio 9 Early Access

It's been a couple of weeks now since the release of Eclipse Indigo and other Application Servers IDEs based on it. Now, it's time for the Eclipse PDT and Zend Studio team to refresh their products with great features that  lots of Web developers will find useful such as Github support, Application deployment support, better formatting and source editing tools for PHP and JS developers.

In this short screen cast you will find a quick review of the features available for the developers working with it.


Stay tune and wait for the official release which is going to happen soon.

Wednesday, September 14, 2011

"git clone" and "application deploy" - Perfect Match

It's amazing, you work on a pretty cool project for a couple of months now and you find out that little has been posted about it.
So here it is... meet Zend SDK. There are many interesting ideas behind this SDK but in this post I am going to focus on how to get started with it.

So... what is Zend SDK?

If you build a Web Application or even a CMS Web site in PHP you probably have asked yourself a couple of times what best practices should I use to develop, publish and discover applications written in PHP. Amazingly, in most modern platforms like Java, Ruby, Flash, Android and iOS it is common to find a dominant set of tools and workflows to streamline development processes. Things like creating application resources, deploying applications, configuring application hosts and even creating a repository of applications that allows others to discover it. However for several reasons PHP developers don't have one way to do such things, just as an example take a look at the famous PHP applications, frameworks and CMSs solutions in the market. This is exactly where the SDK is aiming.
Zend SDK includes a variety of tools that help you create, develop, publish and discover PHP Web applications.
Hence, you can find command line tool, Eclipse plugin, Hudson/Jenkins, Phing, Ant and other tools in our target environments.

Step 1: Clone your application from a Git repository

First thing first, you will need to fetch the application source code and prepare it for the target environment, to do so you can use the "clone project" command line. With this command a project from a git repository is cloned to your local machine and additional deployment descriptor resource is added that will assist you with hosting this application on targets.
zend clone project -r https://ganoro@github.com/ganoro/ExampleProject.git


Alternatively you can create a local empty project based on the MVC of Zend Framework by clicking
zend create project -n helloworld
If you have already fetched your project (with SVN, CVS or other source control version) you can just update the project with the files required to help you with the deployment process:
zend update project -d 
for more information on project management, read this wiki page which goes over the alternatives and provides extra details about the possible arguments of these commands. If you haven't installed the SDK go to this page

Step 2: Add a remote target

This is the easy part, you will need a target that will host your applications. I assume you installed Zend Server 5.5 and it is accessible by your machine. If not, you will need to install it either locally or on a remote machine.

For example adding a remote target with address 10.1.2.34 with a given secret key is possible by
zend add target -h http://10.1.2.34 -k sdk.roy -s cc14b445ad6ed9041d936b7f363a8e5a525275d3960dbb373f35e97e2abcdab2 
This command line will add a new target to the list with the specified API key, for more details on API keys see this page. After installing this target you can use the list target and list applications to see the results:


Example output for a listing command is (read more on targets management here):
royganor@ubuntu:~$ zend list targets -s
Available Zend Targets:
id: 0
	Host: https://10.1.2.34
	Key: Zend 	Status: connected
Step 3: Deploy your application

Now that your application is ready and your target is configured properly, we can go directly to the fun part. deploying you application to the host.
royganor@ubuntu:~$ zend deploy application
Step 4: Test it!
Now you are ready to see if the application deployed successfully by running a stats command or just going to the browser and address the application URL.


royganor@ubuntu:~$ zend list applications
Id:                     67
Application Name:       drupal
User Application Name:  http://default-server/ExampleProject
Base URL:               http:///ExampleProject
Installed Location:     /home/royganor/.apps/http/__default__/0/ExampleProject/1.0.0
Status:                 deployed
Servers:
	id:               0
	Deployed Version: 1.0.0
	Status:           deployed
Deployed Versions:	1.0.0

Step 5: What's next?
In next posts more interesting aspects of the SDK will be covered like creating repositories and publishing your applications to others.As usual if you want to. Till next time, I will really appreciate your feedback on Zend SDK

Saturday, May 21, 2011

Windows Registry API for Windows (plus 64-bit)

Lately I was required to provide a solution that needs access to the Windows Registry Keys. I could easily use the command line tools for this end (reg export or something like this). For some reason I found several glitches with this method, mainly around performance and parsing incompatibilities. So I decided to use this library JNIRegistry - "Windows Registry API Native Interface" (http://www.trustice.com/java/jnireg/index.shtml).

Problem is that it is only compatible with 32 bit and if you are under 64 bit Java, it won't be any good for you. So I had to compile this JNIRegistry library for 64bit. I used Visual Studio 2010 with the Microsoft SDKs 7.1 to compile it with x86_64 compiler. It was a damn nice adventure...

So if you get this error message "ICE_JNIRegistry.dll: Can't load IA 32-bit .dll on a AMD 64-bit platform" you should probably use the second one here:

1. ICE_JNIRegistry.dll for 32 bit

2. ICE_JNIRegistry for 64bit

3. The JNIRegistry library jar

Enjoy ;)


EDIT: one thing I found while using this library under 64bit. you will need to add the "WOW6432node" child if you look for a software-type key. See this article from MS http://support.microsoft.com/kb/896459.

Tuesday, May 03, 2011

Project Planning Thoughts on Flash Builder for PHP 4.5

Wow! it was a real pleasure to take part in and lead the release of Adobe Flash Builder for PHP product. FBPHP is actually an Eclipse-based product that includes both Flash Builder and Zend Studio components and supports the development process of Web and Mobile applications that require server/client communication. It can be a real time saver for startups and large scale companies as it streamlines the process of designers, interactive designers and server side developers in a joint product by Adobe and Zend.

The following two tutorials provide a great overview of how much this product is useful and fun:
I would like to give a quick glance on what was required and achieved during the last 4 months, the team obstacles and some tasks repository analysis.

Project Goals

  • Provide an integrated solution to speed the development of Flex and PHP applications for the web or for mobile
  • Lower the barrier to entry for getting set up to use Flash Builder and Zend Studio together via an easy installation process
  • Streamline the process for creating Flex and PHP projects that are related to one another
  • Improve the data connectivity workflow for connecting Flex apps to PHP services
  • Enable developers to debug client-side Flex code and server-side PHP code simultaneously
  • Meet a tight schedule and integration deadlines for both Adobe Flash Builder and Zend Studio teams.

Quality

  • Features tested – Installation, Serialization, Flex Web/PHP Applications incl. run/debug, Flex Mobile/PHP Application incl. run/debug, Introspection, Remote PHP Server Support, Zend Studio regression
  • Platforms tested – Windows 7 32/64 bit , Vista 32/64 bit , Windows XP SP3 , MAC OSX 10.6
  • PHP Servers tested – Zend Server v5.1, MAMP and XAMP
  • Browsers tested – Firefox , Internet Explorer , Safari, Chrome
  • Devices tested – Motorola Droid 2, Samsung Galaxy S

Bug Repository Analysis

Powered by 6 developers and 4 quality engineers this project had an overall of 700 issues in the system including tasks, sub tasks, bugs, features and improvements. We had to go through a triage and privatization process on a daily basis and create a weekly process which enables short DEV2QA cycles. The result (below) shows that we had an intense two months of development and 2 months of quality work until we actually started the release cycle that took about a month. The release cycle gave us the ability to stabilize our product quality and make sure we have no misunderstanding with the integration level with Adobe and with the product managers of the product.

Created vs. Resolved

Pre-release Advisory Team

  • 177 registered participants, 10-12 very active forum-posters.
  • > 400 posts to prerelease forums.
  • > 25 good quality bugs logged.
  • Most issues either fixed or had a workaround and a few enhancements suggested for future releases

Takeaways

  • Write your requirements and invest time in polishing and updating the docs - it's not a waste of time. It can take a month and people can start building the building blocks, but to have the solution ready on time you must have a document that represents what you are going to implement from beginning to the end.
  • Plan a one month quality term, this will significantly improve your predication to deliver a high-quality product. It will not reduce the stress around release cycle but it will reduce the risk in hitting the final date. During this month, developers are not allowed to contribute code to the project unless there is a specific requirement for that.
  • Our advisory team was very helpful, it is more than important to be responsive and just listen to what they are saying. You are not smarter than they are.
  • Create a positive spirit in the team and set goals that makes sense to all people.
Thanks to Adobe Flash Builder teams that was very communicative and helpful and showed us the way when integration failed.


Sunday, March 13, 2011

Easter Egg for Zend/PHP Developers

One among many new interesting Zend Server 5.1 features is an open "RESTful Web API that allows automation of the management and deployment of Zend Server and Zend Server Cluster Manager, and integration with other Zend or 3rd party software". It basically provides an easy way to control your deployment of Web Servers remotely and set it up correctly for your application when you scale up and down. For example one can remotely configure new Web application server, reset or even build a fully functional cluster by utilizing this new open API.

Since most of the configuration and deployment tools these days have a Java-based plugins mechanism (such as Jenkins / Eclipse) I thought it would be cool if there will be a way to extend these tools with some of the new Web API features. I am proud to introduce Zend WebAPI project that is hosted in Google Code. Zend Web API SDK for Java provides a Java API for Zend Server infrastructure services, making it even easier for developers to build applications that tap into the scalable, and reliable Zend Server product.

You can find a getting started page that explains how to work with this library. This tutorial is based on the following steps:
1. Signing up for Zend Web API Services
2. Getting your Zend Web API Security Credentials
3. View Your Zend Web API Security Credentials
4. Using the Zend Web API SDK for Java
5. To run a sample you can use this code:

/**
* Create the credential object
*/
WebApiCredentials credentials = new BasicCredentials(KEY_NAME, SECRET_KEY);

/**
* Creates the Web API client object
*/
final WebApiClient webApiClient = new WebApiClient(credentials, HOST);

/**
* Retrieve system info
*/
SystemInfo systemInfo = webApiClient.getSystemInfo();

/**
* Print license info from retrieved system info
*/
System.out.println("License order number:" + systemInfo.getLicenseInfo().getOrderNumber());


I am really anxious to see what tools we will built on top of these open API that can make a difference in the world of high availability demand from the market.

Thanks to Shahar Evron (@shevron) who has guided me through the API aspects!

If you find this useful I would be happy to get some feedback and even new contribution!

As an example for utilizing this library I created an Eclipse plugin that is used as a "remote controller" for your Zend Server

For more details click here

Tuesday, February 08, 2011

Public/Private Key Encryption with Java and PHP

Lately, I was struggling with the differences between PHP and Java HMAC encryption methods. Although encryption is rarely used in my most day to day programming tasks, it can probably be useful for people who may need it in the future.

In specific HMAC-SHA256 is used "for calculating a message authentication code (MAC) involving a cryptographic hash function in combination with a secret key". An interesting scenario is that a service that is hosted in a PHP Web application Server interacts with a Java client application client that consumes this service (for example Android mobile application). Since the client knows its private key it can encrypt an agreed message so the server then can verify with the given encrypted signature and authenticate the client.

Enough with talking, let's see how it is done in Java vs. PHP with the following code snippets:


/**
* Encryption of a given text using the provided secretKey
*
* @param text
* @param secretKey
* @return the encoded string
* @throws SignatureException
*/
public static String hashMac(String text, String secretKey)
throws SignatureException {

try {
Key sk = new SecretKeySpec(secretKey.getBytes(), HASH_ALGORITHM);
Mac mac = Mac.getInstance(sk.getAlgorithm());
mac.init(sk);
final byte[] hmac = mac.doFinal(text.getBytes());
return toHexString(hmac);
} catch (NoSuchAlgorithmException e1) {
// throw an exception or pick a different encryption method
throw new SignatureException(
"error building signature, no such algorithm in device "
+ HASH_ALGORITHM);
} catch (InvalidKeyException e) {
throw new SignatureException(
"error building signature, invalid key " + HASH_ALGORITHM);
}
}


where HASH_ALGORITHM is defined as

private static final String HASH_ALGORITHM = "HmacSHA256";


Where in PHP, it's even simpler:

echo hash_hmac('sha256', $message, $secretKey, false);

Wednesday, January 12, 2011

Eclipse PDT and Zend Studio Awarded 'Best PHP IDE' in InfoWorld 2011 Technology of the Year Awards

What is common to Apple iPad, Google Android, VMWare vSphere and Eclipse PDT/Zend Studio?

I have some good news for the Eclipse PDT and Zend Studio team. The InfoWorld Test Center has chosen our tools, Eclipse PHP Development Tools and Zend Studio for one of our 2011 Technology of the Year Awards (Best PHP IDE). The award is based on the ,
comparative review by Rick Grehan.

According to InfoWorld their Technology of the Year Awards, chosen annually by InfoWorld reviewers, go to the best products we tested during the prior calendar year. To be eligible to win, the product has to be reviewed by the InfoWorld Test Center, it has to be outstanding, and it has to belong to a product category that we consider extremely important. In short, Technology of the Year Award winners are rare and special.


On behalf of Eclipse and Zend, we are honored to receive this award as a confirmation of our technology vision and dedication to building the best possible IDE for the PHP community we are committed to the evolution of Eclipse PDT as more and more developers seek to add PHP to their skill set for application development in Web environment.

Congratulation to the team!