This workflow includes the following tasks:
- Creating accounts for GitHub and the Zend Developer Cloud
- Developing a project hosted in Github with Zend Studio and the Zend Developer Cloud
- Debugging your application
- Automatically updating your application in real time
An installed Zend Studio 9.0 (currently on beta) or above. Can be found in one of these pages:
- Zend Studio 9 Beta page
- Zend Studio product page
Creating an Account for Github and the Zend Developer Cloud
In order to use GitHub and the Zend Developer Cloud, you must first set up valid accounts for both.To create a GitHub account:
- Open the GitHub website at https://github.com/.
- Click Plans, Pricing and Signup in the center of the welcome page. The Plans and Pricing page appears. Click Create a free account. The Signup for GitHub page appears.
- Enter your account details in the requested fields, and click Create an account. Your new account page appears.
- Follow the instructions on the Github homepage and create a project and repository.
- For more information on creating a GitHub project go to help.github.com
- Open the Zend Developer Cloud website at http://www.phpcloud.com/.
- Click Login here in the top-right corner of the homepage.
- Click I do not have an account. The Create a new account page appears.
- Enter your account details in the requested fields, and click Register. The Thank you for creating a Zend account page appears.
- Please answer the questions that appear on the page and click Finish. The Log In page appears.
- Enter your account details, and click Log In. The Zend Developer Cloud welcome appears.
- Click Start now to begin working! Save your Zend Developer Cloud credentials as you will need them later in this workflow.

Working with a Project hosted in Github with Zend Studio and the Zend Developer Cloud
Once you have an existing GitHub and Zend Developer Cloud account, you can use the integration features embedded in Zend Studio and Zend Developer Cloud. You can develop, test and deploy a GitHub application on the cloud through Zend Studio. To create a new container:
Zend Studio gives you the option to use only the plugins you need. For this tutorial, you will need GitHub.
Creating a GitHub Project in Zend Studio
To create a GitHub application in Zend Studio:
Deploying Your Application on the Zend Developer Cloud
Open your project in Zend Studio. The default file, deployment.xml, opens.
Debugging Your Application on the Zend Developer Cloud
Automatically Updating Your Deployed Project in Real Time
Zend Studio allows you to automatically update any changes you make in the source code of your application without redeploying the application from the start. Each change you make in the code will be automatically updated in your application on the server.
To automatically update your application:
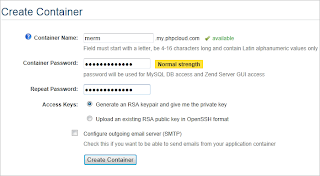
Once you have an existing GitHub and Zend Developer Cloud account, you can use the integration features embedded in Zend Studio and Zend Developer Cloud. You can develop, test and deploy a GitHub application on the cloud through Zend Studio. To create a new container:
- Go to the Zend Developer Cloud homepage and open your account and click Start Now on the welcome page. The Create Container page appears.
- Enter the container name and password in the relevant fields, and click Create Container. The SSH Keypair created window appears.
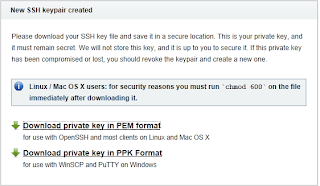
- Click Download private key in PEM format. Save the key on your machine as you will need to browse to it when connecting Zend Studio to your server. Your container has been created and will appear under My Containers on the homepage.

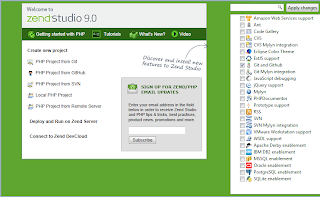
Zend Studio gives you the option to use only the plugins you need. For this tutorial, you will need GitHub.
- Go to Help | Welcome to open the Zend Studio Welcome screen.
- From the plugin list on the right, mark the Git and GitHub.
- When prompted, restart Zend Studio . When you re-open Zend Studio, the GitHub plugin is installed.

Creating a GitHub Project in Zend Studio
To create a GitHub application in Zend Studio:
- Go to File | New |PHP Project from GitHub. The Create Project from GitHub dialog appears.
- Enter the project name and your GitHub authentication details in the relevant fields, and click Refresh. Your application location will appear in the Location box or in the dropdown menu.
- Click Next to move to the Application Deployment dialog.
- Select Zend Application Deployment and create a new target by clicking on the PHPCloud icon . The Add Target dialog box appears
- Enter your Zend.com credentials and browse to your PEM key in the relevant fields, and click Test Connection.
- If no errors appear, click Finish. The Application Deployment section reappears with the target you added.
- Make sure the ‘Add Application Deployment Support’ checkbox is marked
- Click Finish. Your application will opens in the Zend Studio workspace.
Deploying Your Application on the Zend Developer Cloud
Open your project in Zend Studio. The default file, deployment.xml, opens.
- In the Testing area, click Launch a PHP Application The Launch PHP Application dialog opens with the default container you defined during the project creation selected, and your application’s URL
- Click Finish and Yes when prompted about your container’s authenticity
- Your application appears in your container’s page in the Zend Developer Cloud website, and opens in Zend Studio’s internal browser. Keep the internal browser with your application open as you will need it to automatically update the application.
- Open your project in Zend Studio. The default file, deployment.xml, opens.
- In the Testing area, click Launch a PHP Application in Debug Mode
- Your application now appears in the Debug perspective and stops at the first breakpoint. To continue the debug click .
Automatically Updating Your Deployed Project in Real Time
Zend Studio allows you to automatically update any changes you make in the source code of your application without redeploying the application from the start. Each change you make in the code will be automatically updated in your application on the server.
To automatically update your application:
- In the PHP Explorer view, open your projects index.phptml file by going to application| views| scripts | index| index.phptml. The index.phptml file opens in the text editor.
- Make a small textual change in the code and save the project.
- Go to the internal browser of your project and click the Refresh icon . Your application updates with the changes applied.
Note: this article describes the workflow as available today for phpcloud developers. I am not sure if this will be the case in next versions, so you should get updated with the php cloud release notes. It was written by the documentation team at Zend, if you have any comment feel free to post it below.


No comments:
Post a Comment